Hey, I was looking to source an inexpensive battery pack for a new robotics project. I’m looking for 12V (plus or minus 11V to 15V would be fine), and around 80-100Wh. Current continuous would be perhaps 5-10 Amps during the most intense usage. I’m definitely looking for something with Lifepo4 chemistry to be on the safer side in terms of fire / short circuit hazards, and an included BMS.
It was solid, but I was hoping to cut the voltage in half, which would let me run some electronics directly without an additional 25V to 12V converter. But that company is rather pricey, and doesn’t have exactly the same pack in a 12V configuration.
I found these on Aliexpress which look quite solid, but I haven’t seen these sourceable in the United States directly.
Should be fine. The larger cylindrical formats are becoming more popular, and for LiFePO4, I wouldn’t worry at all about them if they’re in a cylindrical layout. As you note, the chemistry is safer, and cylindrical cells don’t tend to suffer problems from warping and bulging like prismatic ones do.
Plus, the equipment to make cylindrical cells isn’t cheap, so it’s a reasonable bet that anyone producing them isn’t going to produce Boeing-grade crap.
Though if you’re concerned about packaging, just buy the cells yourself and assemble them.
Thanks, I didn’t know that fact about the cylindrical cells! Assembling seems like a lot of work (no spot welder here), but maybe I could get the ones with pre-welded tabs and then just solder it together?
For the robot design, it might make sense to split the battery pack, with half the cells on the left/right sides for better balance of the weight.
Others may disagree but I would never recommend soldering battery packs together. Solder is thermo-active and the junction temperatures can weaken the strength of the joint. Plus solder is not particularly structural anyway - it’s a very soft metal alloy. Any potential for disconnection is a potential for arcing, and arcing is a potential for fire. I’d suggest you get a half-decent spot welder for assembling the pack, and then use crimp terminals to connect it to appropriately rated quick-release connectors.
Dude, brah, man, brah, listen, brah, mash that subscribe, listen, dude, man, I’m gonna show you how to solder packs, mash that like, tell all your friends. All the time I’ve got today so join me in 5 minutes for the next vid!!! (YouTube O face thumbnail)
Pre-welded tabs is a sane way to go for packs, though, as you note, solder isn’t structural. You should always secure the pack with something else, be it shrink wrap, hot glue, etc (yes, hot glue softens at a temperature well beyond what a pack should be at).
Spot welders aren’t that expensive anymore, definitely worth having around.
Yes, I admit that the people on youtube who build practical bombs with hundreds of random, assorted 18650 cells seem just a little crazy to me
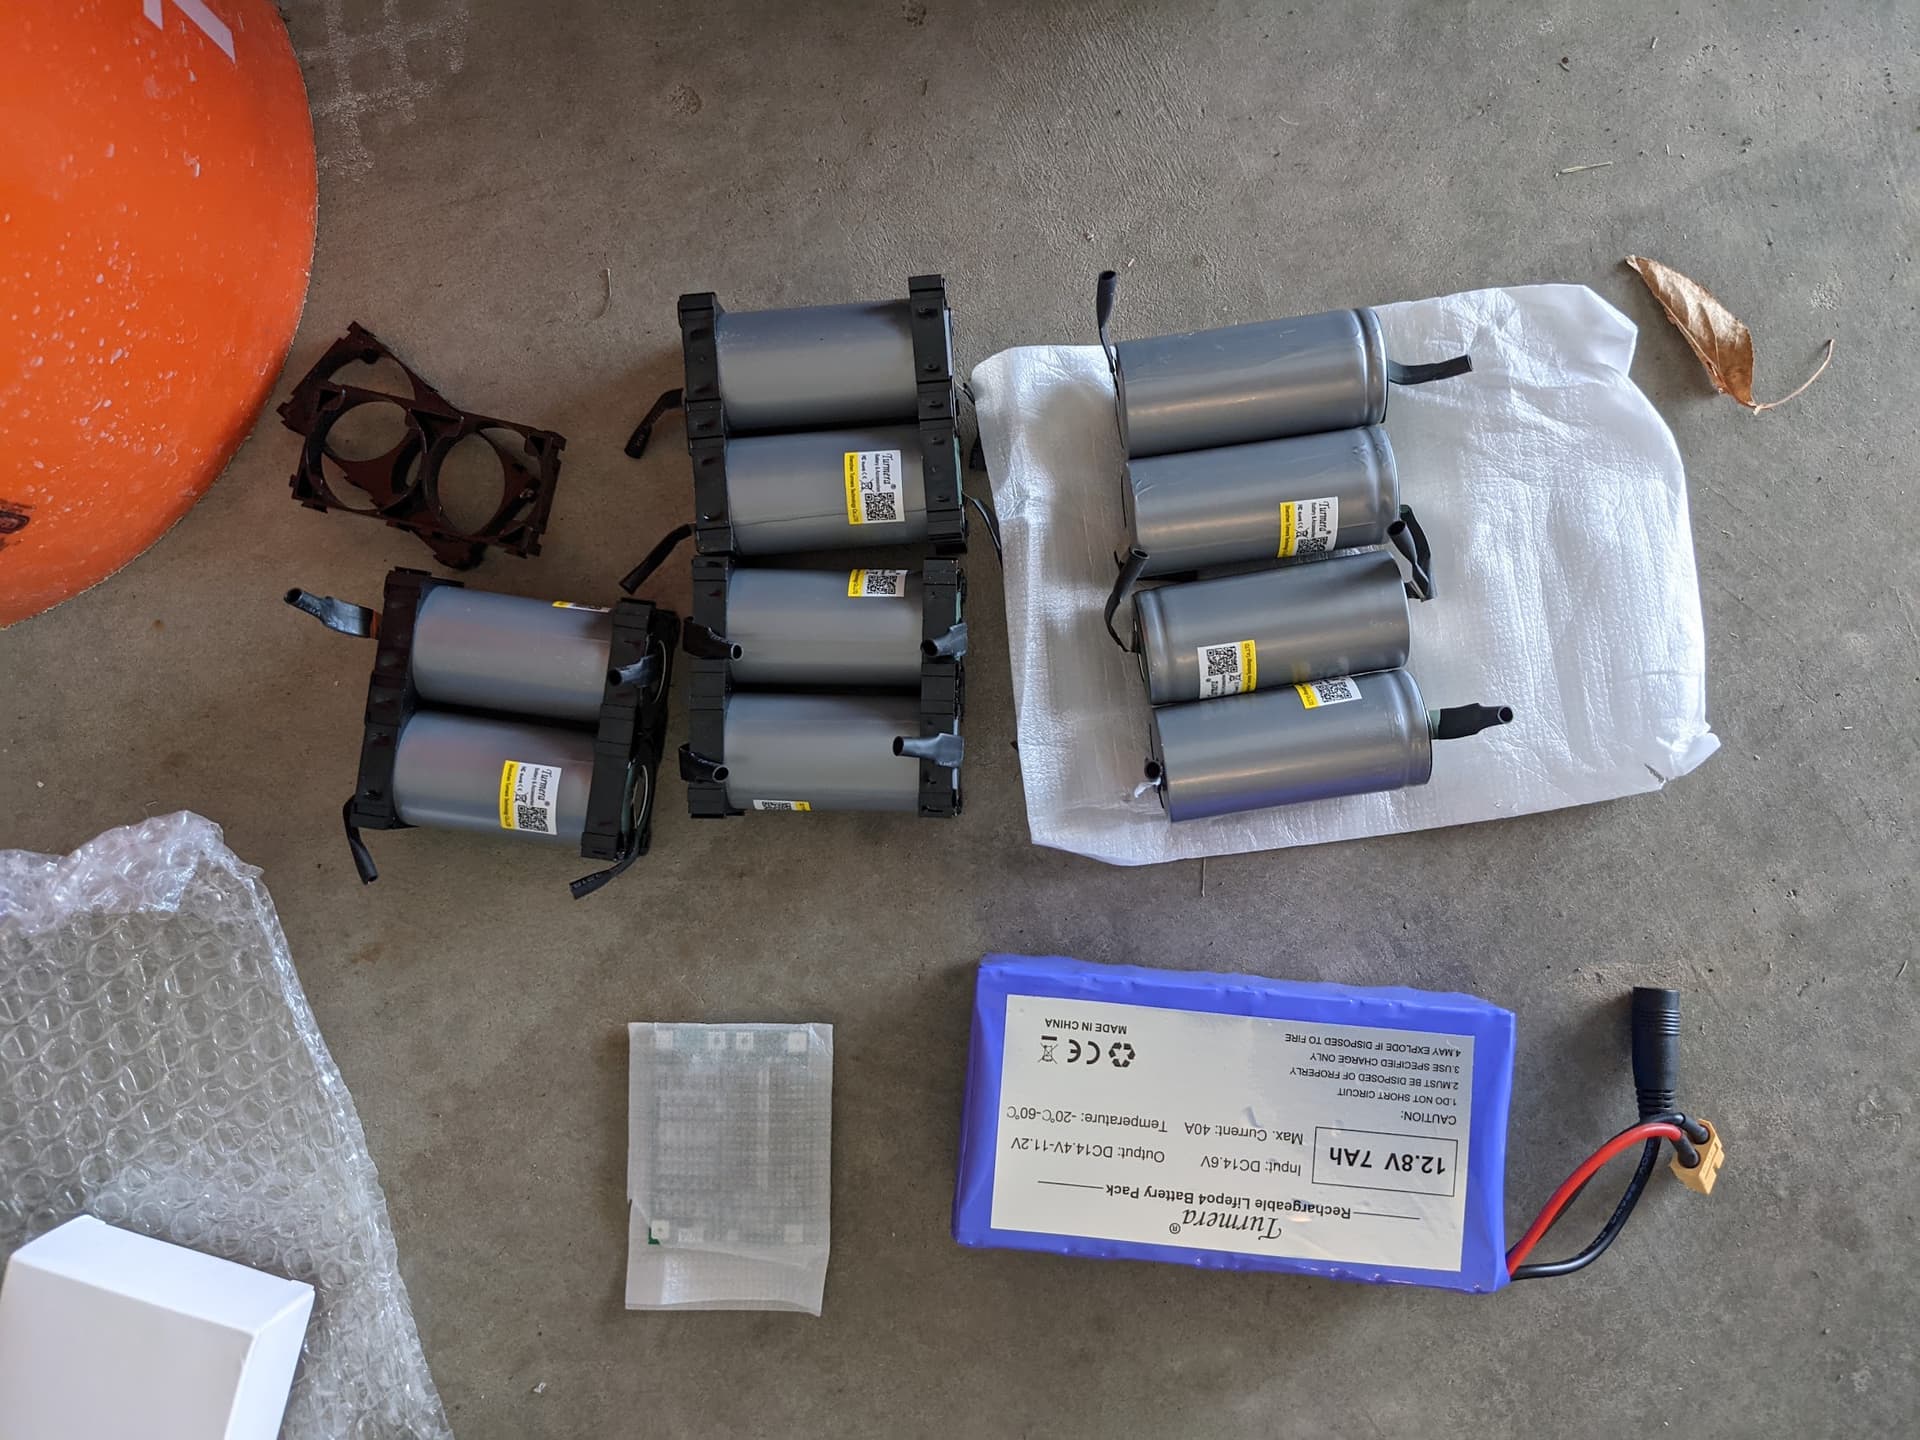
I think I will order a few of those 32700 cells to play with. I think a simple 4s1p configuration will work great, and I will 3D print the structural supports that are needed.
I’ve purchased my battery cells from tenergy.com. I bought a trio of ~30 AHr LiFePo4 packs some years ago, and a pcb, and a charger. They directly (no dc-dc converter) power the 1000 lumen lights on my recumbent (approximately as bright as a car headlight, so that I’m not hidden when stopped next to a car).
Now there are LiFePo4 “12v replacement” batteries now. they’re in the same form factor as lead acid gel batteries, and meant to be drop-in replacements, which simplifies a lot of things.
Hm, they seem to have stopped carrying LiFePo4’s except for those 12v drop-ins. Bummer!
Ordered a few standalone 3270 cells and also a premade 4S pack of them with BMS included. I did a few tests, overall it’s pretty solid. I got ~5700mah out of the 4S pack at 4amps of load, and that’s from 3.5 to 2.8V per cell. I bet you could squeeze out the full 7Ah that they say if you push it all the way.
One bummer was that I got the wrong BMS boards for building my own pack, they were the LiPO ones instead of LifePO, so I’ll stick with the premade one for now. But the new robot design is coming along, and I think we’ll be sticking with a “brick” style battery pack anyways rather that something custom.
A bank of those 3270s with the square ends and some structural plastic around them looks like a really good solution… I may have to grab some to play with. That they’re 12V/6S lead compatible is a nice perk. I’ve thought about hanging a stiff lithium bank in parallel with my office pack, but I’m not sure it really improves anything, and the standalone 10S DC rail has been a “Oh, I should do this…” project for quite a few years now.
Hopping in on this a bit, question on charging LiFePO4 cells. I have a smallish 1s ~500-600mAh (pre-tabbed) with this PCB that I’m going to try and use as a rechargeable power source for my wall Zigbee wall switches.
Specs say max charge at 1C (600mAh), although I’d prefer lower than that. The few I’ve found out there that aren’t meant for specific size cells are 0.7a chargers, which is too high, and the other few random I’ve seen out on Amazon are all LiPo, or 12v LiFePO4, which won’t do, and a few that might work, but aren’t cheap and even the ones that are, I find them very suspect the way they’re labeled.
This board which implies it can do LiFePO4 3.6v charging and I can adjust the current with a resistor, but doesn’t seem to be a via for that, so despite finding the datasheet, and probably could reverse engineer the circuit and figure it out, doesn’t seem very safe.
This charger looks like it can easily do them all, but it’s $30, although I’d bet is reasonably solid.
And then I already have some of these CC/CV boards, and I figure with the PCB above, I can just set the voltage to ~3.6v, and current to 0.3a and it’ll be alright.
So, @Syonyk, what do you think of the CC/CV method which I already have? Or would I be tempting fate for burning my apartment down?
That will work just fine. There’s literally nothing special about charging lithium. Limit the current until the voltage hits your CV voltage, then hold that as current tapers down, and then maybe don’t let them sit on the charger forever, but even that’s not a huge deal if you keep the charge voltage away from “stuffed to the gills.” 3.6V for LFP should be totally fine, that’s away from the “really, really full” point without losing many Ah at all.
Got the CC/CV setup, now need to 3d print off the box, add the battery-side fuse (500mA glass, my multi-pack has 300 and 500, nothing in between. Paranoia is a survival trait!), and the barrel input. I’m going to go so far as to add a momentary switch and a mini voltmeter.
After getting the settings, I hooked the battery up, and it’s right at 3.62v with my real voltmeter, but the CC/CV light is still blue meaning charging. Which, since it’s not quite fully charged, makes some sense I suppose. So I figure I need a way to check it now and then to make sure it’s up to the end voltage I need it to be.
Probably won’t have time to mess with the wall switches until the weekend to try and get one of them powered via this. Might even mean I need to print off new replacement face plates, since I thought the 14505 would be narrow enough, but seems like it’s just a millimeter or two shy of fitting comfortably underneath. sigh Naturally. I do have 1 more to print off, so might do it with that one to make sure.
If you don’t need max capacity out of the cell, you should only charge it to the CV voltage and stop there. It should be at about 90% full at that point. This is the trick that enabled lithium powered cars. Charging to 100% means you get 100-200 cycles out of a battery. Charging to 90% means you get 1000 cycles!
It might also make charging even simpler, by just using a fixed voltage supply, no charge controller needed. Caveat; I’ve not actually tried this myself yet.
Dell laptops now let you set in the BIOS “max battery charge”, which is great because it works without OS support/drivers.
I wish we had programmable BMS boards; I would love to be able to extract data like # of cycles, % charged, charge rates, and also set things like max charge, also limit depth of discharge.