Ah, the joys of homeownership with “modern” appliances.
When all that stands between happiness and a pile of wet, half bleached and very soapy diapers is a cheap little flimsy piece of plastic that has cracked and failed, leaving you with a washing machine that won’t drain.
Of course, the washer is out of the main warranty. After some brief consideration of how it failed and the noises it was making, it seemed that the drain pump was a likely suspect - so, out it comes.
If you’ve got a similar washer and hate videos, you may find this useful. If not, well, enjoy a partial teardown and successful repair of the piece of modern consumer electronics that is a front load washing machine.
Of blog related note, this is the image heavy post that was literally impossible to edit in the new Blogger interface last year that drove me to migrate my blog to Jekyll.
The LG WM3370HVA Front Load Washing Machine
It washes clothes. You put them in, press buttons, and it squirts water, swooshes stuff around, cleans clothes, and entertains kids (especially if their stuffed animals are “taking a bath”). There are quite a few different variants of this washer, but they should all be generally the same on the inside.
We got ours in 2016, and it worked fine up until recently, when it stopped draining properly (of course, at an annoying point in time). My wife hauled the half finished load of diapers up to the neighbor’s place up the hill, finished it, and I set about figuring out why the washer wasn’t draining, and why it was going “click click click” while attempting to drain.
The conclusion? A drain pump. Washers typically have some sort of pump to kick the dirty water out of the drum and into the house sewage system. On the LG washers, this pump seems to fail pretty regularly - and I have some ideas as to why, having taken it apart…
You don’t have to take the whole washer apart to get to the drain pump - as far as repairs go, this is probably a “one beer repair.” But the only guides I found were video, and they didn’t really cover this model exactly. So, off I go.
Plus, it was an excuse to play with a new camera for blog posts (which, at this point, has been used rather extensively, this post being most of a year delayed).
Opening the Washer: Top and Control Panel
To get at the drain pump, you’ll need access to the front and rear of the washer. On the rear, you’ll find some connectors between the top and the back. Unscrew the bottom screws on both sides, then slide the top back about an inch. Pull it back too far, and it will hang up on stuff inside and not come off.
With the top off, you’ll find the guts of your washer exposed. There’s a large plastic drum suspended by some springs, a power converter, some tubes… really, the sort of stuff you’d expect to find in a modern washer.
The next step is to remove the control panel. Start by taking the “stuff tray” out. The big button labeled “Push” in the center of the back section will release a catch and let you pull the whole drawer out. Our water does have a bit of sediment that builds up over time, so it’s a good time to clean it out.
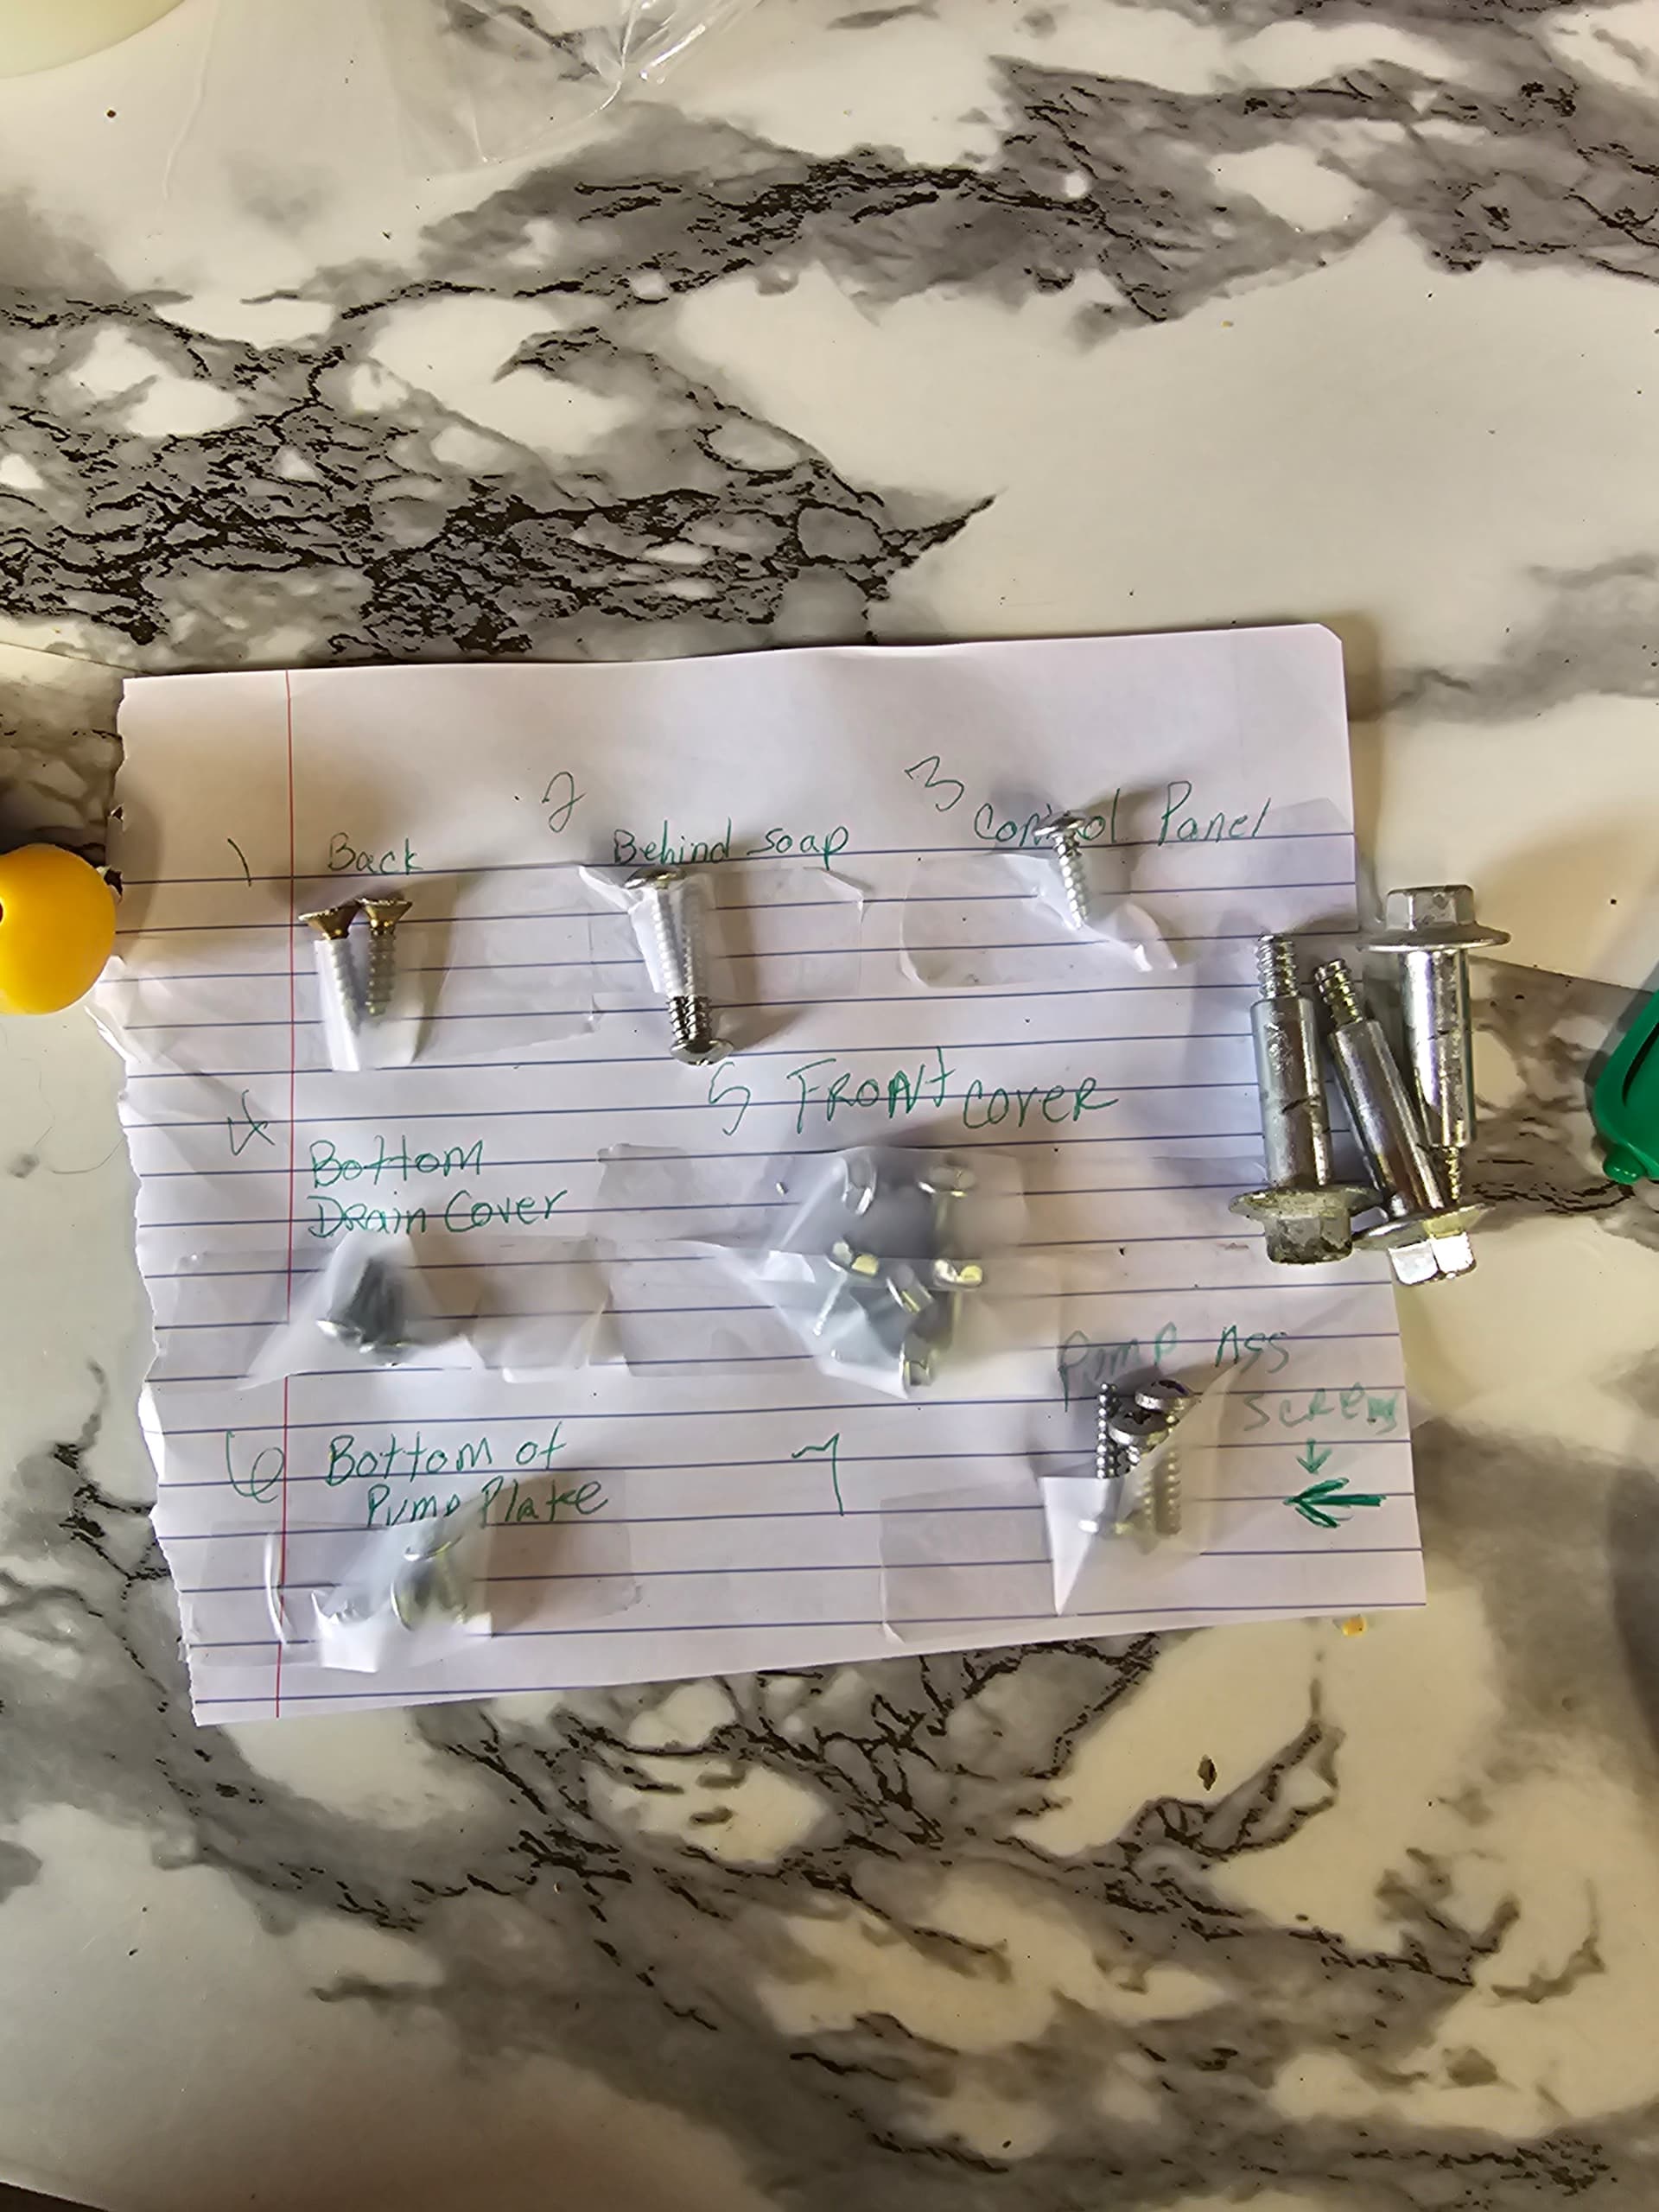
Once the tray is out, you can remove the two screws on either side. They’re longer than the other screws you’ll pull out, if you don’t keep track of where stuff goes.
Seriously, though. Keep track of where stuff goes. There are several different types of screws in here, and they don’t exchange with one another.
There’s one more screw holding the control panel on, and it’s on the back in the other corner. You’re taking out the round headed screw, not the lower hex headed one - that doesn’t need to come out.
Next, disconnect the electrical connections going to the front panel. They should be color coded and size keyed so you can’t mix them up going back together, but verify this as you take them apart.
There are several ways to get these connectors apart, some more destructive than others. The correct method is to press down on the little tab (the right part, here), and it should slip under the retaining clips and let you pull the connection apart. One could also use a small screwdriver to pop the tabs up, but that’s not the right way. They may be a bit stiff, so the usual “wiggle it some” technique applies here.
With the three screws out (the two by the soap tray and the one in the other corner), the front control panel is just held on by clips. It’s easiest to start over at the left corner and work across - you can see how the plastic clips over the metal. Just work it off gently and the whole thing should come loose.
Fish the wires out, and the whole thing comes off. You could just set it on top with the wires connected, but it’s easy enough to remove those connections and get it out of harm’s way. Now might be a good time to wash it off, if you haven’t done so recently. Bafflingly to me, the ink used on the control panel seems to dissolve when exposed to laundry detergent for any length of time…
Now is actually a good time to clean most of the washer, because you’ll have it open.
Opening the Washer: Front Panel
With the control panel removed, the next step is getting the front panel off.
Open the washer door and look at the bottom of the grey gasket. You should see a spring. This tensions the band that holds the whole gasket in place. Get a screwdriver and carefully (you don’t want to damage the gasket!) pop one of the sides free. Pry it “out and away,” and it should come free easily enough.
Once it pops loose, gently remove the metal band from around the door gasket and set it aside.
With nothing holding the door gasket in place, you can peal the gasket off from the lip it seats over. Work around the edge and it should come free easily. Shove it inside the front plate so it doesn’t get damaged as you’re removing the front.
Reach through the now-open hole into the washer guts and remove the wiring harness from the door lock. Press the tab, wiggle the connection free. There is no need to remove the lock mechanism from the door, though some instructions I’ve seen say you should. The entire mechanism just comes off with the front panel and isn’t in the way of anything.
Open the door in the lower left for cleaning the drain pump filter. Drain the filter housing (with the hose) and remove the filter. If you’ve got a load of laundry in the washer when the pump fails, this hose will come in handy to drain the washer - it’s the low point in the washer water system. Just use a large bucket, because even high efficiency washers can hold a bunch of water!
Remove the two screws from the plastic shield.
With the shield removed, you’ll find one more screw, probably driven at an angle. Remove this one too. No, there is no matching one on the other side.
Finally, remove the six hex headed screws from the top - three on each side. When the last of these comes out, the front panel should be free to tip forward slightly and lift off.
It sits on three tabs at the base. You do not need to tip the washer back to access screws - all this can be done with the washer upright and either on the ground or on the drawer (not that the drawer does anything but raise the washer up - with a two year old, anything stored there is a toy).
You may, if you wish, walk around with the door making faces at your kids through it. This is not a required part of the repair process.
But, looking in the lower left corner of the now opened washer, you should see the drain pump!
Removing the Drain Pump Assembly
On some of the washer designs, the drain pump is screwed to the front plate - you can actually see the screw holes for mounting it here. On this model, at least, the drain pump sits on there rubber bushings that help keep the noise down. Flat metal panels make great speakers if you shake them quickly, and the rubber mounting helps keep vibrations from the drain pump quieter.
There are two large spring clamps you’ll need to remove. Grab your favorite pair of channel lock pliers (or something similar), squeeze the tabs, and slide them up the hose a bit. If you’ve worked on many car cooling systems, it should be entirely familiar (and oddly easy - draining soapy water doesn’t bond hoses to the hard parts nearly as badly as coolant and high temperatures seems to). Once the hoses are free, remove the base with the pump.
The bolts are 10mm, and there are three of them. Two on the front, one in the back. The right one and the back one are easy enough to get at, but you’ll need a socket on an extension to get at the front left one (or you can get creative with some holes in the front of the panel, but… seriously, just get a socket and extension).
Once the pump is free, you still have to remove the wiring connections from it. Black on top, red on the bottom, though I’m not sure it really matters looking at how the motor is wired internally. Fish the wiring out from the various clips that hold it in place. Remember, the drum can move around - just push it up to free the pump!
One drain filter and pump assembly, failure unknown. Water from the tub comes in the back through the large port, is filtered by the big chunky filter you hopefully removed, goes out the side, and is driven up and out by the pump impeller through the left port.
Remove the screw holding the outer housing in place, then remove it. The “square bit” hangs over the motor drive coils - just pull it out slightly and it’ll come free. There are two more screws to remove, but the pump motor won’t come free quite yet, because it’s hung up on the mounting plate.
Flipping the plate over, there are two screws on the bottom, and one on the front. Remove those, and the drain pump assembly should come free. Tug on the pump (there’s an O-ring sealing it to the housing), and that should come off as well!
I immediately had some clue as to the nature of my problem when the impeller fell off the pump shaft. There’s supposed to be some sort of nub in there that the pump drives against, and that nub appears to have broken off. The motor shaft can spin almost freely, which explains both the lack of draining, and the clicking I was hearing.
You can see a few O-ring seals around the shaft - these help to reduce (not eliminate, but reduce) the water flowing through the bearings and into the magnet housing.
New motor and impeller next to the old one. Annoyingly, it doesn’t seem you can find just the impeller - it’s the whole assembly or nothing. Also, if the impeller looks like a cheap piece of injection molded plastic that would be entirely at home in a kid’s toy, you’d be right. It’s not a confidence inspiring piece…
If, as I was, you were a bit concerned about the third port on the housing that didn’t seem to go anywhere - that’s because it doesn’t. This assembly seems to be a multi-purpose sort of pump housing that can support different equipment as needed. I’d guess it’s molded with all the holes plugged, and the required ones are bored out depending on the product.
Reassembly Notes
While reassembly is, quite literally, the reverse of disassembly, here are a few tips to help you along the way.
Don’t screw the bolts holding the drain pump platform down very tightly. They screw into some soft plastic, and it’s easy to strip them out if you apply much torque. “One finger tight” with a short wrench is fine!
Make sure the drain hoses are both fully seated and that the clamps are fully on the hard plastic. If the hose isn’t fully seated, or the clamp is sitting on the edge of the plastic nipple, you could get a leak later on - and those make quite the mess.
Don’t forget to reconnect the door latch wiring harness before putting the door seal back on!
The hardest part is getting the metal band around the door seal. It’s easier with an extra hand or two. Fully seat the door seal behind the lip first. Seat the spring at the bottom of the door, hold the spring in place, and then work it around the edge. It will likely take a few attempts, but if you have an extra hand to hold the spring in, it should go faster. You’ll need a good bit of force to get the last few inches snapped around the door seal.
While You’re Back There…
Clean out your inlet filters, if you haven’t done so recently. Take the water hoses off, get a small pair of pliers, and pull the plastic filters out.
Then, look inside, and wiggle the metal filters out. The plastic filters have larger gaps than the second metal layer.
Rinse them off, put them back. You can slip the metal dome into the plastic piece and push them back in together.
Random Other Disassembly Notes
While I’m in here… the amount of flex on the door seal is properly impressive. It’s a very flexible bit of rubber-like substance!
The lower supports for the drum are some sort of small shock absorbers. They move, but damp the motion significantly in the process.
Most of the drum weight is supported by the springs at the top. You can also see the impressively small power converter. I’m not sure what voltage this contraption runs at internally.
Interestingly, the complex valve cluster is on the cold water side. This routes water to the various parts of the soap tray - softener, soap, bleach, etc. The hot water valve is just a single hose.
I do enjoy the “drive for cost reduction” in worm gear clamps over the years. I’ve seen some pretty sketchy “improvements,” but this takes the cake. Just some bent up wire, with a screw driven through it. I guess it works…
The Motor Assembly
Finally, if you’re curious about the actual motor assembly and how it works, I took that apart too.
This, however, is not a motor assembly - it’s a meadow lark that’s been hanging out on our “planted tree top” basically all year so far and singing in the evenings. We quite like the pair out there! This sort of wildlife photography is part of why I got the new camera that I’ve been experimenting with here - it’s a “superzoom” Canon, and while the optics and sensor aren’t amazing, it really does accomplish the goal of reaching out and pulling in the distance.
The motor assembly comes apart into three main components: The impeller (cheap piece of crap on the left), the motor housing in the center, and the rotor on the right (a magnet on a shaft). The whole assembly is sealed by the big O-ring around the housing, so everything inside that runs wet. I don’t know how much water gets back in there during normal operation, but it definitely has some water and debris flow through it over the years.
While I haven’t pulled the entire assembly apart, the magnetic bits and pieces of the motor wrap around the plastic, working from outside the wet region.
Looking at the back, you can see better how the magnetic plates wrap around the outside of the rotor housing - these just carry magnetic flux up from the coils down lower and spin the shaft. I’m not convinced the motor is at all directional - with only two inputs for the magnetic coil, it probably just picks a direction at startup and spins that way as the field oscillates. Or there’s some bias magnets in there that help it spin a particular direction. No idea, and as this is a perfectly functional spare with a bit of work, I’m not going to fully dismantle it either.
Looking into the front of the housing, you can see the plastic molding that the top of the field guides slips into. It’s a neat design, and while I’m sure the efficiency losses from the gap between the stator and rotor are substantial (there’s a fairly thick plastic wall there), having the whole thing sealed up so there are no bearings that have to maintain a water seal is certainly worth the reduction in efficiency!
The rotor is just a magnet on a shaft. There are a bunch of O-rings in the assembly, indicating that it’s not designed to run “fully flooded,” but it certainly doesn’t matter if it gets a bit damp in there.
The drive for the impeller is this brass fitting with the finger sticking out. I’m fairly certain the O-ring here is just to provide a stronger friction fit such that the impeller doesn’t slip off. The drive torque goes through the finger.
Or, at least, it should… when the bit of plastic in the impeller has broken free, you don’t get a spinning impeller. Just some annoying clicking.
Again, this little piece of plastic is the actual failure here. You just can’t get this part separate from the entire motor assembly (that I was able to find).
However, as far as I can tell, nothing bad would happen if you just epoxied this to the brass end of the shaft… or drilled the shaft and pinned this in place with a roll pin of some sort (though make sure it didn’t work free, it’s not a trivial task to get at things).
Final Thoughts
Fundamentally, this process is an example of my problem with modern appliances: You can’t buy the failed part alone, but only the whole assembly. There’s no reason I had to spend $50 to replace the whole drain motor when the failure was a $0.50 (likely far less) bit of plastic, but that’s simply how things are sold these days. I don’t know if there’s a design life on the drain pump assembly as well that would require replacement around the time this part fails (bearing life or something), but it doesn’t seem like anything else is having issues, at least at a first order “poke with it” sort of inspection.
But it was an easy enough repair, and sure beats paying someone else to come out here and fix it.
I remain quite irritated by the quality of modern consumer electronics appliances. In under five years, with brand new appliances, I’ve had to replace the washer drain pump, I had a rather rapid failure on our deep freezer thermostat, and I can’t count how many times I’ve had to fight with the idiotic icemaker in our kitchen fridge because it ices the fan up constantly.
Oh, and buy a water sensor to put under your washer. It will make your life easier if something doesn’t seal up properly and you’ve got a leak.
Fix your stuff when it breaks! It’s great!
This is a companion discussion topic for the original entry at https://www.sevarg.net/2021/07/18/replacing-drain-pump-in-lg-wm3370hva/